Showing posts with label Tutorials. Show all posts

Saturday, November 1, 2014

Static routing !


In this tutorial let me show you how to configure static routing procol and what kind of  routing protocols first we want to know what kind of routing protocols

Routing protocols (Dynamic routing  & static routing )

For Dynamic routing it contains (Ripv1 , Ripv2 , OSPF , IGRP , EIGRP , BGB)

But in this tutorial I will talking about Static Routing and how to configure it

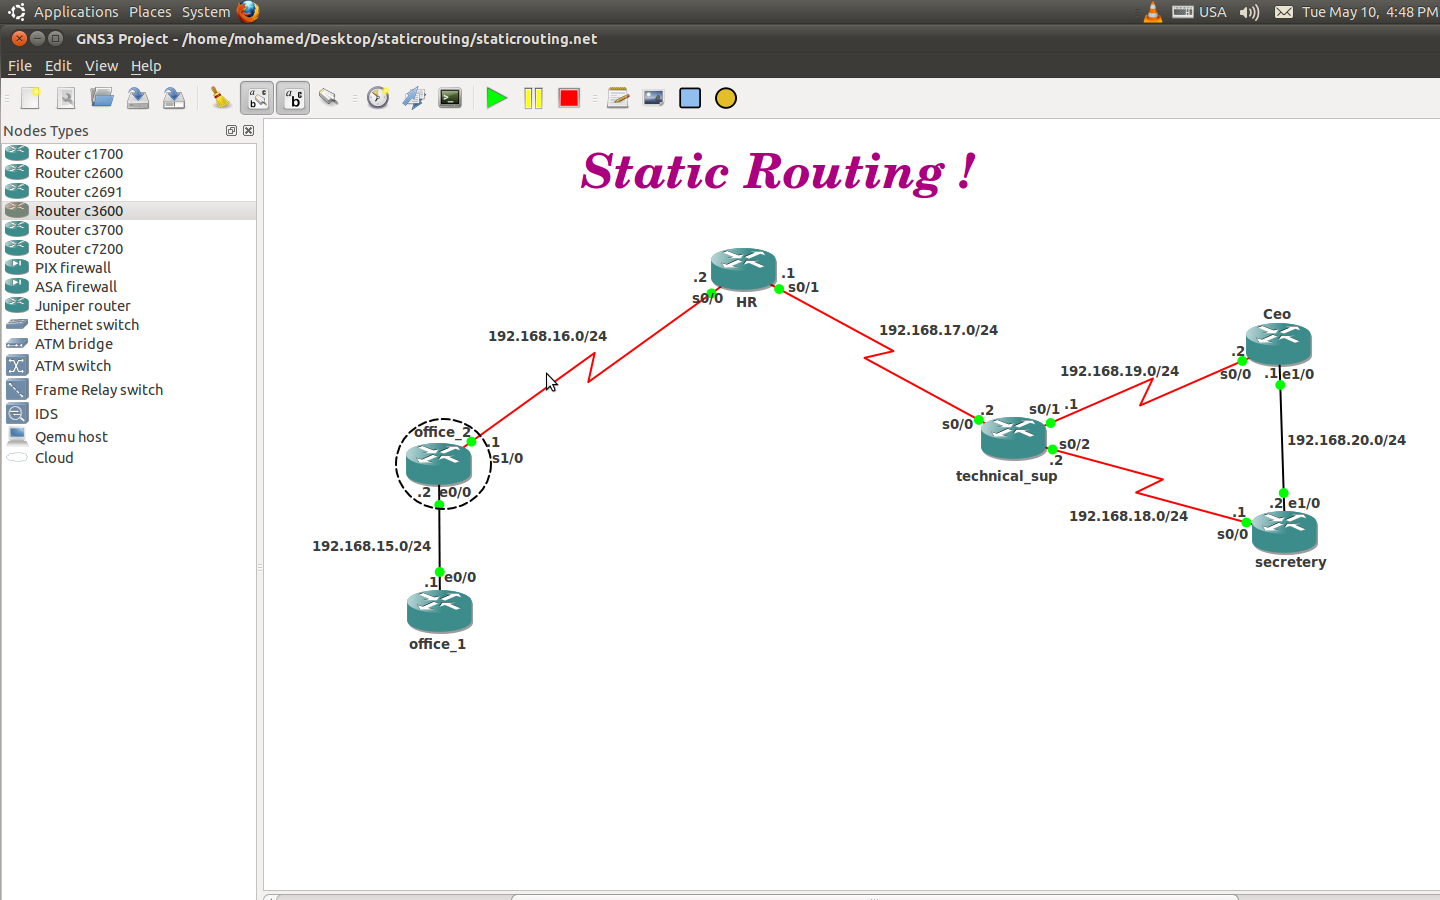
First please look at this picture and tell me how many network in this picture ?


 Sure you will answer me it has be found 6 networks


It means all routers can send and receive information between each other do you think that ?! Ok lets try to ping between routers to see if I can send and receive data between all this networks or not

Ok lets try to ping between office_1 and office_2


Success!


Lets try to ping between office_2 and HR


Success!


Lets try to ping between HR and technical_sup


Success!


Lets try to ping between technical_sup and secretery then ceo routers


Success!

Lets try to ping between secretery and ceo


Success!


But if we try to ping between remote router it will be not able to ping between each other like for example try to ping between office_1 and HR router it will not be able to ping don't believe me ? Ok lets try it


Failed!

So why packets not sent for this routers ? Because office_1 go to routing table and look at it and didn't find any address called 192.168.16.2 it mean it can't reach to this address and sure packets will be dropped and will be unreachable to the destination .. so how can we fix this problem ? Sure we can use static routing or we can use routing protocols or we can use based policy routing ..

But in this tutorial we will talking about static routing protocol and how to ..


What about if we want to tell router office_1 go to talk with HR or technical_sup router or ceo router or secretery ? We should tell it exit from  interface (blabla) or go to from (blabla) ip ddress ok in the static routing protocol we should now something about it ..

If office_1 want to send packets or talking with HR router it should put ip route then destination ip and subnet mask then you can type (exit interface or you can type next hop ip  ) 
Notes :
Hop mean Router .

Let me give you an example about that but please I want to tell you about office_1 it has been called stub network .. stub network mean one way to the destination it mean it not has been found any way to the destination without this interface so
If office_1 router want to talk to technical_sup it can talking with by two ways :
By give it  ip route then (router ip) then next hop ip
Or you can type ip route then (router ip) then exit interface


Practical :


Router office_1 is astub network
So we should type default route it will be configure like that : ip route 0.0.0.0 0.0.0.0 (next hop) now go to office_1 router and type :

Ip route 0.0.0.0 0.0.0.0 192.168.15.2 (this is next hop way)


Or


Ip route 0.0.0.0 0.0.0.0 e0/0 (this is exit interface way)


office_2 have astub network why ? Because one way to the destination .


ok now go to office_2 then type


ip route 0.0.0.0 0.0.0.0 192.168.16.2


then go to HR router and type ip route 192.168.15.0 255.255.255.0 s0/0

and ip route 192.168.17.0 255.255.255.0 s0/1

and try to ping between office_1 and HR routers it will be success!

now go to technical_sup router and type ip route 192.168.16.0 255.255.255.0 s0/0


for connecting between office_2 router and technical_sup router .. and type on technical_sup router ip route 192.168.15.0 255.255.255.0 s0/0 for connecting between office_1 and technical_sup router .. and type on technical_sup router ip route 192.168.20.0 255.255.255.0 s0/2 .. and type on technical_sup router default route by type  ip route 0.0.0.0 0.0.0.0 s0/0 (because its astub network) .


now go to secretery router and type ip route 192.168.19.0 255.255.255.0 e1/0 .. and type ip route 192.168.17.0 255.255.255.0 s0/0 ..  and type ip route 192.168.16.0 255.255.255.0 s0/0 .. and type ip route 192.168.15.0 255.255.255.0 s0/0 ..


now go to ceo router and type ip route 192.168.18.0 255.255.255.0 e1/0 .. and type 192.168.17.0 255.255.255.0 s0/0 .. and type 192.168.16.0 255.255.255.0 s0/0 .. and type 192.168.15.0 255.255.255.0 s0/0 ..


Now try to ping all routers between eachother and now you can send and recieve packets between each other .

Notes :

please check your routing table by type (ip route) to see changes .


Wednesday, October 15, 2014

how to create free hosting and free cpanel

how to create free hosting and free cpanel how to connect for mysql server and and select it and testing if this connected or not ! hello in this tutorial let me show how to create anew free hosting (mysql and cpanel and ftp server) and how to connect with the server and select data inside phpmyadmin and test the connectivity.

first go to this site here

and start to sign up .

ok after finish it will send for you message have all your informations about your hosting like (mysql cpanel ftp ) hostsname & usernames and passwords .

go to login to your host and put the username of cpanel and password

host2 pic

now go to Database Management and choose MySQL Databases

host3 pic

now you create anew database name for example type here program then press on creatDatabase

host4 pic

now you are created anew database and called
host5 pic

now go to and close MySQL Databases page and go back Database Management again and press on phpmyadmin and you will see your created database name please press on connect now
host6 pic

now you are connected with phpmyadmin now Create new table on database 0lx_7324950_program
for example put in the name box name software and in Number of fields box put for example 4
then press on Go .. now you are on the table settings for example go and install this settings in the table like this pic

host7 pic


then press on save .. after you press on save it will be like that

host8 pic

now press on Browse to check

Wednesday, May 7, 2014

how to open interface on router and give to it ip !


In this Tutorial I will show you to how to open interface on router and give to it ip !


First look at this pic :


We can see :

Employees_Router (give it ip 192.168.15.1 and subnet mask 255.255.255.0)


Pc Name
Ip Address
Subnet Mask
Emp_1 192.168.15.2 255.255.255.0
Emp_2 192.168.15.3 255.255.255.0
Emp_3 192.168.15.4 255.255.255.0
Emp_4 192.168.15.5 255.255.255.0


Lets start and show you how to give it all this devices ips and open interface on router first go to router then enter to global configuration mode (if you don't know how to go to global configuration mode resume this lesson please here


Then type : interface f2/0  like that
Employees(config)#interfac f2/0 then enter

Give ip for this interface by typing :
Ip address 192.168.15.1 255.255.255.0

Then type no shutdown

Now it will appeare for you message tell you Fastethernet2/0 changed state to up like this pic


Notes : 

you can disable this message by go to gloable configuration mode and enter to line console 0 then type logging syncronous

like this picture  :


If you want to verify the interface type :
Show ip interface brief


Now go to vpcs to configure ips to pcs to enable ping between eachother if you don't how please check it here


Emp_1 ip 192.168.15.2 192.168.15.1 255.255.255.0
Emp_2 ip 192.168.15.3 192.168.15.1 255.255.255.0
Emp_3 ip 192.168.15.4 192.168.15.1 255.255.255.0
Emp_4 ip 192.168.15.5 192.168.15.1 255.255.255.0


after you can test to ping between eachther pcs


Enjoy !

Thursday, May 1, 2014

How to install VPCS under linux Ubuntu Add pcs on gns3 !

In this Tutorial I will show to you configure VPCS to add Pcs and configure Ips for Pcs devices ..

 first download VPCS from here  


After downloaded you should go to direction : cd /home/username/Downloads/

Then   unzip vpcs-0.21a.zip


Now go to    cd 0.21a/

Then ls
Then change mode to excutable like that : chmod +x vpcs (32 or 64)

After that type ./vpcs(64 or 32)


Now it will be start like that :

VPCS[1]>
Type 1 for pc1
Type 2 for pc2
Type 3 for pc3
Type 4 for pc4
….


If you want to give ip and subnet mask and gateway like this you should type :

Ip then ip-range then default gateway then subnetmask like that :


Ip 192.168.15.2 192.168.15.1 255.255.255.0


after that type : VPCS[1]> show

  to apply all your ips and see what is the LPORT and RPORT ( this import will see later )


Now go to open your gns3 project and go to Edit and choose Symbol manager and choose computer and press on > button to add this to customized nodes and press on computer  double click to change the name of this device now go to the top  in the Name : and change name to anyname you want and choose from Type : and change it to cloud then press on apply then  press on ok  ..

now press on the pc it will be appearing for you like this pic


then press on the name of your pc for example press on Emp_1 as you could see the pic

go to NIO UDP like this pic


Now you can touch my Notes about (( LPORT and RPORT )) look at your VPCS to see whats your LPORT and RPORT and vice versa those it mean put LPORT number on RPORT  number  and put RPORT on LPORT number and in Remote  host type your localhost or 127.0.0.1 then press on  Add  button then Apply then ok Now you are done !


Enjoy !

Tuesday, March 1, 2011

Directly connected, Routing table, some codes in routing table, how to connect between routers .

Example about Directly connected :

cast :

Robert
Sarah
Aamy


## Robert met agirle in the university


and ask her : Hello,Whats your name?

1- the girl answered : My name is Sarah .
And Sarah asked him , whats your name ? he said My name is Robert ।
Now Sarah and Robert have been directly connected with each other .


## then he went to another girl :


and asked her Hello, whats your name?
2- the girl answered My name is Aamy .
And Aamy asked him , whats your name ? he said My name is Robert |
Now Aamy and Robert have been directly connected with each other .


$$ Now Robert has known Sarah and Aamy and directly connected with both of them |
But Sarah & Aamy didnt know each other .


## while Robert walking with Sarah he met Aamy and :


Robert Said : Sarah! this is Aamy
Sarah Said : Oh! Hello Aamy
Aamy Said : Hello Sarah


Now Sarah & Aamy connected by robert by sharing Robert's friend Aamy to Sarah and sharing him friend Sarah to Aamy but we want to say here in Routing protocol friends mean
( neighbors ) its mean we are using Routing protocols for disseminating information that enables them to select routes between any two nodes on a computer network .


as we can see in routing table


first we want to know somthing about Routing Table .


we need to know some codes like :

C - connected, S - static, I - IGRP, R - RIP, B - BGP
D - EIGRP, EX - EIGRP external, O - OSPF, IA - OSPF inter area .


C - connected : this mean my router directly connected for your router.
S - static route : this mean by Administratore.
I - IGRP : An interior gateway protocol (Routing protocol)
R - RIP : Routing Information Protocol (Routing protocol)
B - BGP : Border Gateway Protocol (Routing protocol)
D - EIGRP : Enhanced Interior Gateway Routing Protocol (Routing protocol - Cisco proprietary)
O - OSPF : Open Shortest Path First (Routing protocol)


example about how to connect between routers and show routing Table ..etc


go to R1 then press on it to configure it by console cable then enter to it and type :


R1>enable ( User mode )
R1# ( Privilege mode )
R1#configure terminal ( Type configure terminal to go to Global configuration mode )
Enter configuration commands, one per line. End with CNTL/Z.
R1(config)# ( Global configuration mode )
R1(config)#interface e0/0 ( Type your interface )
R1(config-if)#ip address 192.168.30.10 255.255.255.0 ( Type your ip for this interface )
R1(config-if)#no shutdown ( Enable this interface )
R1(config-if)# ( Press on CNTL/Z to end and go to previlige mode )
*Mar 1 00:04:24.019: %LINK-3-UPDOWN: Interface Ethernet0/0, changed state to up *Mar 1 00:04:25.019: %LINEPROTO-5-UPDOWN: Line protocol on Interface Ethernet0/0, changed state to up

## Don't forget to type :


R1#copy running-config startup-config ( to save your configuration to NVram )
Destination filename [startup-config]? Building configuration... [OK]

Now we want to show routing table by type :

R1#show ip route


its mean R1 and R2 has been directly connected .


Now we will go to R2 to configure it by type :

R2>enable
R2r#configure terminal
Enter configuration commands, one per line. End with CNTL/Z.
R2(config)#interface e1/0
R2(config-if)#ip address 192.168.30.1 255.255.255.0
R2(config-if)#no shutdown
R2(config-if)#
*Mar 1 00:01:36.827: %SYS-5-CONFIG_I: Configured from console by console
*Mar 1 00:01:37.563: %LINK-3-UPDOWN: Interface Ethernet1/0, changed state to up
*Mar 1 00:01:38.563: %LINEPROTO-5-UPDOWN: Line protocol on Interface Ethernet1/0, changed state to up
R2(config-if)#exit
R2(config)#interface s0/0
R2(config-if)#ip add
R2(config-if)#ip address 192.168.31.10 255.255.255.0
R2(config-if)#no
R2(config-if)#no sh
R2(config-if)#no shutdown
R2(config-if)#
*Mar 1 00:05:47.079: %LINK-3-UPDOWN: Interface Serial0/0, changed state to up
*Mar 1 00:05:48.083: %LINEPROTO-5-UPDOWN: Line protocol on Interface Serial0/0, changed state to up


## Dont forget to type :

R2#copy running-config startup-config
Destination filename [startup-config]?
Building configuration...
[OK]


its mean R1 and R2 has been directly connected and R2 directly connected with R3 .


if you didnt understand configuring R2 lets see it again in R3 :


configure R3 by type :

R3>enable
R3#configure terminal
Enter configuration commands, one per line. End with CNTL/Z.
R3(config)#interface s0/0
R3(config-if)#ip address 192.168.31.1 255.255.255.0
R3(config-if)#no shutdown
R3(config-if)#exit
R3(config)#interface s0/1
R3(config-if)#ip address 192.168.32.10 255.255.255.0
R3(config-if)#no shutdown
R3(config-if)#
R3#
*Mar 1 00:14:52.195: %SYS-5-CONFIG_I: Configured from console by consolecop


## Dont forget to type :


R3#copy running-config startup-config
Destination filename [startup-config]?
Building configuration...
[OK]
R3#


its mean R3 directly connected to R2 and R4 .


if you didnt understand configuring R3 lets see it again in R4 :


configure R4 by type :

R4>enable
R4#conf
Router#configure t
Router#configure terminal
Enter configuration commands, one per line. End with CNTL/Z.
R4(config)#interface s0/0
R4(config-if)#ip address 192.168.32.1 255.255.255.0
R4(config-if)#no shutdown
R4(config-if)#exit
*Mar 1 00:00:59.595: %LINK-3-UPDOWN: Interface Serial0/0, changed state to up
R4(config)#interface
*Mar 1 00:01:00.603: %LINEPROTO-5-UPDOWN: Line protocol on Interface Serial0/0, changed state to ups
R4(config)#interface s0/2
R4(config-if)#ip address 192.168.33.10 255.255.255.0
R4(config-if)#no shutdown
R4(config-if)#exit
*Mar 1 00:01:33.667: %LINK-3-UPDOWN: Interface Serial0/2, changed state to ups
*Mar 1 00:01:34.675: %LINEPROTO-5-UPDOWN: Line protocol on Interface Serial0/2, changed state to up
R4(config)#interface s0/1
R4(config-if)#ip address 192.168.34.1 255.255.255.0
R4(config-if)#no shutdown
R4(config-if)#
*Mar 1 00:01:57.135: %LINK-3-UPDOWN: Interface Serial0/1, changed state to up
*Mar 1 00:01:57.163: %LINEPROTO-5-UPDOWN: Line protocol on Interface Serial0/2, changed state to down
*Mar 1 00:01:58.135: %LINEPROTO-5-UPDOWN: Line protocol on Interface Serial0/1, changed state to up
R4(config-if)#end
R4#
*Mar 1 00:02:03.679: %SYS-5-CONFIG_I: Configured from console by consolecop


## Dont forget to type :


R4#copy running-config startup-config
Destination filename [startup-config]?
Building configuration...
[OK]
R4#


its mean R4 directly connected to R3 and R5 and R6 .


if you didnt understand configuring R4 lets see it again in R5 :


configure R5 by type :


R5>enable
R5#conf
R5#configure t
R5#configure terminal
Enter configuration commands, one per line. End with CNTL/Z.
R5(config)#interface s0/0
R5(config-if)#ip address 192.168.33.1 255.255.255.0
R5(config-if)#no shutdown
R5(config-if)#
*Mar 1 00:01:06.927: %LINK-3-UPDOWN: Interface Serial0/0, changed state to up
*Mar 1 00:01:07.931: %LINEPROTO-5-UPDOWN: Line protocol on Interface Serial0/0, changed state to up
R5(config-if)#exit
R5(config)#interface e1/0
*Mar 1 00:01:28.047: %LINEPROTO-5-UPDOWN: Line protocol on Interface Serial0/0, changed state to down add
R5(config-if)#ip address 192.168.35.10 255.255.255.0
R5(config-if)#no shutdown
R5(config-if)#end
*Mar 1 00:01:50.099: %LINK-3-UPDOWN: Interface Ethernet1/0, changed state to up
*Mar 1 00:01:51.099: %LINEPROTO-5-UPDOWN: Line protocol on Interface Ethernet1/0, changed state to up


## Dont forget to type :

R5#copy running-config startup-config
Destination filename [startup-config]?
Building configuration...
[OK]
R5#

its mean R5 directly connected to R6 and R4 .


if you didnt understand configuring R5 lets see it again in R6 :


configure R6 by type :


R6>enable
R6#conf
R6#configure t
R6#configure terminal
Enter configuration commands, one per line. End with CNTL/Z.
R6(config)#interface e1/0
R6(config-if)#ip address 192.168.35.1 255.255.255.0
R6(config-if)#no shutdown
R6(config-if)#exit
*Mar 1 00:01:04.083: %LINK-3-UPDOWN: Interface Ethernet1/0, changed state to up
*Mar 1 00:01:05.083: %LINEPROTO-5-UPDOWN: Line protocol on Interface Ethernet1/0, changed state to up
R6(config)#interface s0/0
R6(config-if)#ip address 192.168.34.10 255.255.255.0
R6(config-if)#no shutdown
R6(config-if)#end
*Mar 1 00:01:26.159: %SYS-5-CONFIG_I: Configured from console by console
*Mar 1 00:01:27.779: %LINK-3-UPDOWN: Interface Serial0/0, changed state to up
*Mar 1 00:01:28.787: %LINEPROTO-5-UPDOWN: Line protocol on Interface Serial0/0, changed state to up

## Dont forget to type :

R6#copy running-config startup-config
Destination filename [startup-config]?
Building configuration...
[OK]
R6#


its mean R6 directly connected with R4 and R5 .


Notes :

1- sometimes type something wrong and appear for you like this message its mean Domain server and your router thought you are having domain lookup called for example (Ki) which i typed wrong


in this case if you want to disable Domain server enter to ( Global configuration mode ) and type
R1(config)#no ip domain lookup

2- if you want to troubleshooting your interfaces if it up or down u should type :
Router#show ip interface brief
or you can type Router#show interfaces s0/0


рей-if you want to verifying Mac Address on Ethernet interfaces you can type :
Router#show interfaces f0/0

3- its found two types of serial cables ( DCE & DTE ) if you want to know are this interfaces using ( DCE or DTE ) you should type for example :
Router#show controllers s0/0 (s0/0 its mean for any interface you want to configure it)

after that you should type on DCE interface cable you should type for example :

Router(config-if)#clock rate 64000

Saturday, February 19, 2011

Basic configuration !


(>) for user mode


(?) for help


Type (enable) on the user mode to enter to the privilege mode

(#) for privilege mode


Type (configure terminal) on the privilege mode to enter to the global configuration mode


(config)# for global configuration mode

Note:

1. This case understanding the abbreviation for example : you can type ena (for enable) and you can type conf t (for configure terminal)

2. Use your Tab key for complete your abbreviation .. for example you can type ena then press on Tab key for complete your abbreviation after press on Tab key it will be enable another example conf then Tab key it will be configure then type t it will be terminal … (Basics#conf +Tab key igure t +Tab key it will be Basics#configure terminal ) .

3.if you want to move from global configuration mode to privilege mode press on CTRL + C or CTRL + Z or you can type end or exit


Now you can configure your router lets start


Basics(config)#hostname (the name of your router)


Basics#terminal history size 50

This command for save latest 50 commands

to disable this command it will be Basics#terminal no history size 50

Note:
You can change number 50 to any number u want


To install clock on your router

Basics(config)#clock timezone gmt +2

Basics#clock set 07:11:00 february 17 2011
Basics#
* Feb 17 05:11:00.000: %SYS-6-CLOCKUPDATE: System clock has been updated from 04:26:28 gmt Fri Mar 1 2002 to 07:11:00 gmt Thu Feb 17 2011, configured from console by console.


You can show clock set by this command

Basics#show clock
07:11:39.067 gmt Thu Feb 17 2011


 (Top commands using on cisco devices)


Basics#show running-config 1.
This command for know what is the setting for this device but this settings not added to memory you should type this command to copy it to memory (Nvram) by type Basics#copy running-config startup-config


2. Basics#show interfaces

This command for show some information about your router interfaces and what is MTU (maximum transmission unit) and BW(Bandwidth) and know if the protocol down or up ..etc


3. Basics#show ip interface brief

This command for know if this interface up or down and are found any problem on layer two or layer one .


4. Basics(config-if)#no shutdown
This command for open the interface or enable it by enter to interface mode then type no shutdown command

For example :

Basics(config)#interface f0/0
Basics(config-if)#no shutdown


Basics(config-if)#no shutdown

*Mar 1 04:45:47.382: %LINK-3-UPDOWN: Interface FastEthernet0/0, changed state to up
*Mar 1 04:45:48.382: %LINEPROTO-5-UPDOWN: Line protocol on Interface FastEthernet0/0, changed state to up


5. Basics#show ip route

This command for show routing table&this routing table for showhow routers can connect with each other and which type of this protocols used to connect with another routers .


6. Basics#show version

This command for show a lot of information about this device for example router model , memory , configuration register , IOS revision number , IOS name .


7. Basics#debug


For example debug ip routing
debug eigrp packets
Basics#debug eigrp fsm
Basics#debug ip rip

This command using for Troubleshooting between protocols by sending updates between routers or know how many hops the way when the packet travelling to the destination to disable debug type Basics#undebug all .


8. Basics#show history

This command for show what commands your are typed


9. Basics#show ip protocols

This command for show some information about what protocols used on this router and what is the router ID and some Routing Information Sources .

10. Basics#write

This command equal copy running-config startup-config its mean copy configuration to memory (Nvram)

Basics#write
Building configuration...
[OK]


We want to configure

Console port
Vty port (telnet)
Aux port


For configure Console port lets see


Basics(config)#line console 0
Basics(config-line)#password cisco1
Basics(config-line)#login
Basics(config-line)#exec-timeout <0-35791> Timeout in minutes

exec-timeout command is used to configure the number of minutes without terminal activity before the session is automatically ended to diable it you can type Basics(config-line)#no exec-timeout

Note :

Line console (0) for one console port on the router


For configure Vty port (telnet) lets see

Basics(config)#line vty 0 15
Basics(config-line)#pas
Basics(config-line)#password cisco2
Basics(config-line)#login

Note :

1. Basics(config)#line vty 0 15 in the old IOS not support more than 5 user to telnet this router but in the new IOS it will be support 16 user to configure this router by telnet port .


For configure aux port lets see

Basics(config)#line aux 0
Basics(config-line)#password cisco3
Basics(config-line)#login


Now we should save our configuration to Nvram(memory) bye typing

Basics# copy running-config startup-config


Lets see how can put password for privilege mode

Basics(config)#enable secret cisco3


Note:
You can put some banners or message for warning any one try to login into your router
Banner login
Motd (message of the day banner )
Or (exec-banner)

For configure banner login type Basics(config) banner login #dont try to login#
For configure Motd (message of the day banner ) Basics(config)#banner motd # arning message dont try to login my router :- #

The following example sets a MOTD banner. The pound sign (#) is used as a delimiting character.
For configure (exec-banner) Basics(config)#$ $ Session activated. Enter commands at the prompt $

The following example sets an EXEC banner. The dollar sign ($) is used as a delimiting character.


To encrypt the passwords we should enter to global configuration mode the type Basics(config)#service password-encryption

Then type Basics#show running-config


Ok now we want to add ip address to interfaces and give it subnet mask lets see

Go to global configuration mode then type Basics(config)#interface f0/0

Then put the ip address and subnet musk Basics(config-if)#ip address 192.168.10.1 255.255.255.0


Now we need to verify are this interface become up or not lets see by type this command Basics#show ip interface brief


Note :

You can put small description on the interfaces for example

Basics(config-if)#description IT department


Don’t forget to save your configuration to startup-config (Nvram)


Enjoy!!